While sipping hot cocoa and snuggling up to a Hallmark movie playing on the TV is cozy, the winter season calls for more than that. The magic of Christmas isn’t just in the lights or the gifts- it’s in the little moments that make a house feel like home. Whether you’re transforming your classroom, decorating your bedroom, creating homemade gifts and whether it’s with family or friends, these simple yet adorable DIY crafts will make your house a snug winter wonderland. So grab your glitter, glue and partner(s), and get ready to make memories—and decorations—unique to this year.
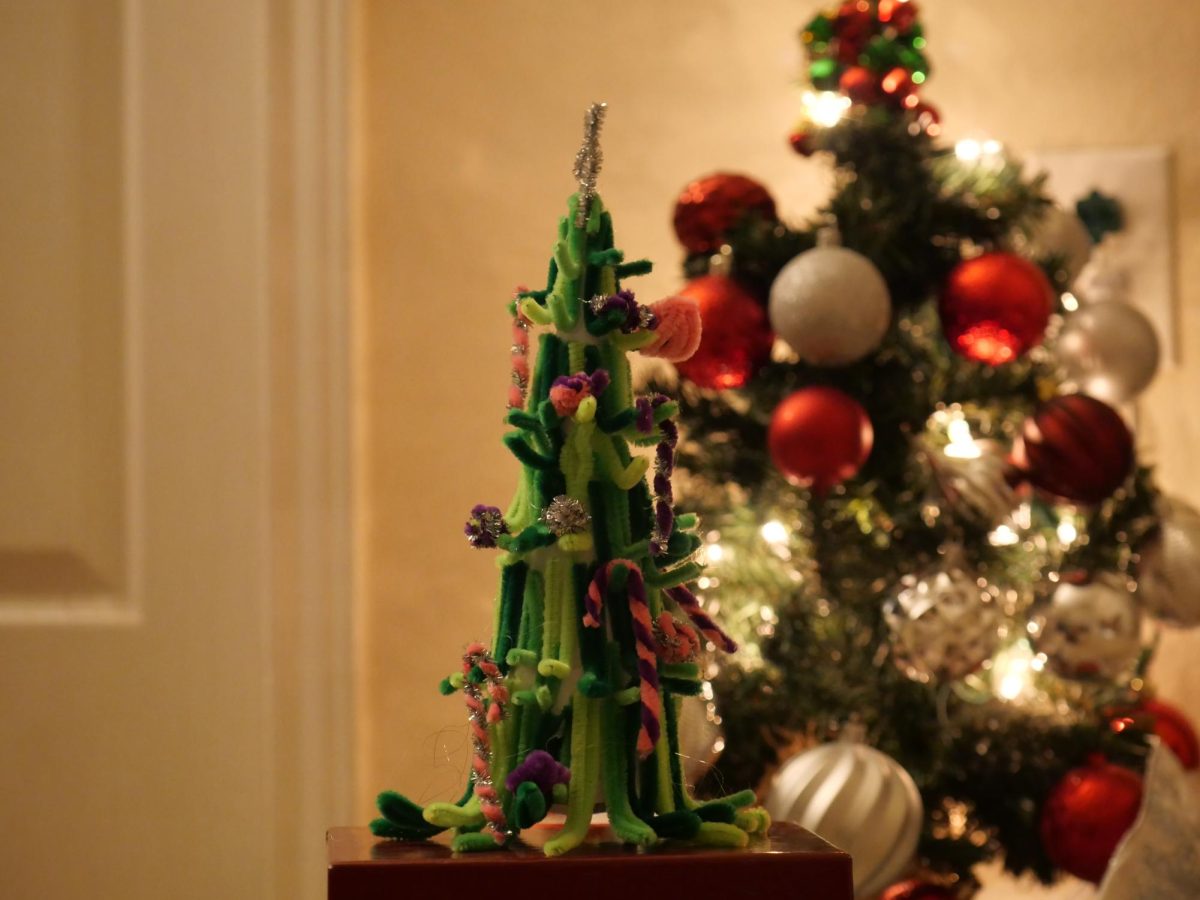
Bring the charm of the holidays to life with this whimsical mini Christmas tree made from pipe cleaners, as seen on TikTok! Perfect for decorating your desk, gifting, or enjoying a crafty afternoon with friends, this tree is both easy and fun to make. Follow these steps to create your festive masterpiece. For materials, you’ll need: Green pipe cleaners for the tree body, pink (or another color) pipe cleaner for the bow topper, red and white pipe cleaners for ornaments and candy canes, a hot glue gun, and scissors.
Step 1: Start by cutting several green pipe cleaners into equal lengths. These will form the “branches” of your tree.
Step 2: Take one full-length pipe cleaner and twist one end tightly into a small spiral to create the tree’s top.
Step 3: Gradually wrap the remaining pipe cleaner in a circular pattern, expanding outward as you work your way down to create a cone-shaped tree structure.
Step 4: To fill in the branches, use additional green pipe cleaners to add volume to the tree. Cut smaller pieces and twist them into a cone shape to make the tree look fuller. Ensure that the pipe cleaners overlap slightly to create a dense, layered look for your tree.
Following current trends, I made a tree with a bow topper and will suggest you do the same to add more holiday variety to your craft; you are able to make various toppers in the shapes of stars or something else. Step 5 (Optional): To make the pink bow topper that I added, take a pink pipe cleaner and form a small bow by looping the ends and twisting the middle; attach the bow to the top of the tree by twisting its ends around the peak.
Step 6 (Optional): To make candy cane ornaments to add to the tree, or its vicinity, take red and white pipe cleaners, twist them together to form the striped effect and cut them into small pieces. Then, bend the top of each piece into a hook to resemble a candy cane.
Step 7 (Optional): For other ornaments and decorations, cut colored pipe cleaners into small pieces and form them into tiny circles or balls to serve as ornaments. Attach the ornaments and the candy canes on the tree branches. You can either twist them around the branches or use a dab of hot glue to secure them.
Refer to the first photo in the gallery. This charming DIY Christmas tree is now ready to shine! Display it on your desk, gift it to a loved one, or use it as part of a holiday centerpiece. The beauty of this craft lies in its simplicity and the endless ways you can customize it. Happy crafting!
If you want to decorate your actual Christmas tree, new ideas are forever coming in. From decorating with simple lights and bows to putting roses in place of ornaments. Have fun with your creativity, because there is no wrong answer when it comes to decorating—especially for Christmas.
Other ideas to scatter through your houses include gift pillars, as seen on TikTok. This eye-catching DIY is perfect for creating a cheerful focal point in your entryway or living room. Using simple materials, you can make a gravity-defying illusion that’s both festive and fun. For materials, you’ll need: three-to-four empty cardboard boxes of varying sizes (lightweight), wrapping paper in holiday patterns, decorative bows or ribbons, a hot glue gun, double-sided tape, and weights for the boxes (optional).
Step 1: Prepare the boxes. Select lightweight boxes in different sizes to make a tiered effect. Tape each box shut securely to ensure the shape holds. Add a small weight if you plan on placing the DIY craft outside.
Step 2: Wrap the boxes each in festive holiday wrapping paper. For variety, use different patterns and colors. Secure the wrapping paper with tape, make sure the edges are neat and smooth. You can decorate the boxes with bows, and ribbons, for a gift-like look.
Step 3: To stack the boxes, begin by deciding the angle at which each box will be stacked. Slight tilts will create the illusion of them being precariously balanced. Using the hot glue gun, secure each box to the one below it. Apply the glue generously in lathers to the bottom of the box and press until the glue sets. Work your way up, stacking each box at angles to achieve your cascading look.
Step 4 (Optional): For extra sparkle, you can add fairy lights or LED string lights around the pillar to make it glow beautifully at night!
Refer to the second photo in the gallery. These stacked gift box pillars will be a showstopper in any holiday setup. Perfect for parties, photos or just spreading Christmas cheer, this DIY is as fun to make as it is to display.
If you’re looking for something more on the carefree side, there are ways to make snowflakes from Q-tips as depicted on this TikTok. All you need is a hot glue gun, scissors, clear string, and of course, some Q-tips.
Step 1: Use scissors to cut the Q-tips into different lengths. For a classic snowflake look, cut about 4 of them in half, leaving the others at their full length. You can also cut some into smaller pieces to create intricate details in your snowflake.
Step 2: Begin arranging the Q-tips into a snowflake pattern. Start by placing 6 pieces of Q-tips in a star-like shape, forming the basic arms of the snowflake. Glue each Q-tip where they meet at the center, creating a symmetrical shape.
Step 2.5 (Optional): For extra detail, you can glue additional Q-tips between the arms of the snowflake or add smaller pieces along the edges. Feel free to get creative and experiment with different angles and placements to create a unique design.
Step 3: Allow the glue to dry completely before moving on to the next step. This may take about 10-15 minutes, depending on the glue you’re using.
Step 4: Once the snowflake is dry, cut a piece of string or yarn about 8-10 inches long. Use the glue gun to attach one end of the string to the top center of the snowflake. Hold it in place for a few seconds to ensure it sticks.
Step 5: Once the string is securely attached and the glitter is dry (if you used any), your Q-tip snowflake is ready to hang! Tie a loop at the end of the string and hang it from the ceiling, a window, or along a festive garland. Refer to the third photo in the gallery.
In all, the holiday season is the perfect time to get creative with your friends and make some DIY Christmas decor. Whether you’re looking for a cute way to decorate your car or room, or spread holiday cheer around the campus, crafting with others is a great way to bond and make memories. With a little creativity, some simple materials, and a dash of holiday spirit, you can make personalized decorations that reflect your style and the season’s joy. So grab your friends, gather your supplies and dive into these easy, festive DIY projects that will bring a little extra cheer to your Christmas celebrations.


![Broadcast, yearbook and newspaper combined for 66 Interscholastic League Press Conference awards this year. Yearbook won 43, newspaper won 14 and broadcast took home nine. “I think [the ILPC awards] are a great way to give the kids some acknowledgement for all of their hard work,” newspaper and yearbook adviser Paige Hert said. “They typically spend the year covering everyone else’s big moments, so it’s really cool for them to be celebrated so many times and in so many different ways.”](https://cphswolfpack.com/wp-content/uploads/2025/05/edited-ILPC.jpg)


![Looking down at his racket, junior Hasun Nguyen hits the green tennis ball. Hasun has played tennis since he was 9 years old, and he is on the varsity team. "I feel like it’s not really appreciated in America as much, but [tennis] is a really competitive and mentally challenging sport,” Nguyen said. “I’m really level-headed and can keep my cool during a match, and that helps me play a bit better under pressure.” Photo by Kyra Cox](https://cphswolfpack.com/wp-content/uploads/2025/09/hasun.jpg)

![Bringing her arm over her head and taking a quick breath, junior Lauren Lucas swims the final laps of the 500 freestyle at the regionals swimming competition on date. Lucas broke the school’s 18-year-old record for the 500 freestyle at regionals and again at state with a time of 4:58.63. “I’d had my eye on that 500 record since my freshman year, so I was really excited to see if I could get it at regionals or districts,” Lucas said. “ State is always a really fun experience and medaling for the first time was really great. It was a very very tight race, [so] I was a bit surprised [that I medaled]. [There were] a lot of fast girls at the meet in general, [and] it was like a dogfight back and forth, back and forth.” Photo by Kaydence Wilkinson](https://cphswolfpack.com/wp-content/uploads/2025/03/Kaydence-2.7-23-edit-2.jpg)
![As her hair blows in the wind, senior Brianna Grandow runs the varsity girls 5K at the cross country district meet last Thursday. Grandow finished fourth in the event and led the varsity girls to regionals with a third place placement as a team. “I’m very excited [to go to regionals],” Grandow said. “I’m excited to race in Corpus Christi, and we get to go to the beach, so that’s really awesome.” Photo by Addison Bruce](https://cphswolfpack.com/wp-content/uploads/2025/10/brianna.jpg)


